Implementing Multi-Language Support in Canvas Apps Using JSON Translation Files
July 07, 2026
#Canvas App#SharePoint#Power Automate
Chetan Jha
Introduction
If you have ever built a Power Apps Canvas App for a global organization, you already know the pain. One team in France needs everything in French, another in Germany expects German, and your head office insists on English. The usual workaround? Duplicate apps, manual hardcoded text, or a bulky switch statement that becomes a nightmare to maintain.
There is a better way - and it does not require republishing your app every time a translator updates a word. In this guide, I will walk you through a clean, scalable approach to multi-language support in Canvas Apps using JSON translation files stored in SharePoint. The app dynamically loads the right language at runtime via a Power Automate flow, populates a collection, and every label, button, and message on screen reads from that collection. Switch a language and everything updates instantly - no code change, no republish.
IMPORTANT: What you will build: A Canvas App that supports multiple languages (English, French, German, Dutch) with a live language switcher. Translation files are stored in SharePoint and can be updated by your content team without ever opening Power Apps Studio.
Business Scenario
Imagine you are a Power Platform developer at a manufacturing company with offices across Europe - UK, France, Germany, and the Netherlands. The operations team uses a Canvas App daily to manage inventory and cases. Half the team struggles with English labels, leading to input errors and support tickets.
The business requirement is straightforward: the app should automatically detect or allow the user to select their preferred language, and all labels, buttons, and messages should appear in that language - without IT involvement every time a translation needs updating. The solution we build here solves exactly that. Translations live in SharePoint as JSON files. A Power Automate flow fetches the right file. The Canvas App builds a lookup collection and every control reads from it. Your localization team can update a JSON file in SharePoint and every user sees the new text by the next morning - zero developer effort.
Prerequisites
Need help with your business solution?
Our team can help you implement the right solution for your organization.
Before you start, make sure you have the following in place:
Access to Power Apps
Access to Power Automate (ability to create cloud flows)
A SharePoint Online site where you can create document libraries
Basic understanding of Canvas App formulas (Power Fx)
Step-by-Step Guide
Step 1 - Create the SharePoint Document Library and Upload Translation Files
The first thing we need is a place to store the translation files.
1.1 - Create the Document Library
1. Navigate to your SharePoint site.
2. Click Site Contents from the top navigation.
3. Click New and select Document Library.
4. Name the library AppTranslations and click Create.
NOTE: Keep the library name without spaces. This makes it easier to reference in Power Automate file paths without URL encoding issues.
1.2 - Create Your Translation JSON Files
Each language gets its own JSON file. The file name must match the locale code exactly ,this is what the Canvas App passes to Power Automate when requesting a language. Create the following files using any text editor:
TIP: Always validate your JSON before uploading. Paste the content into jsonlint.com to catch missing commas or brackets. A broken JSON file means the app gets no translations at all.
1.3 - Upload Files to SharePoint
1. Open the AppTranslations library you just created.
2. Click + Create or upload, then Upload files.
3. Select all four JSON files and click Open.
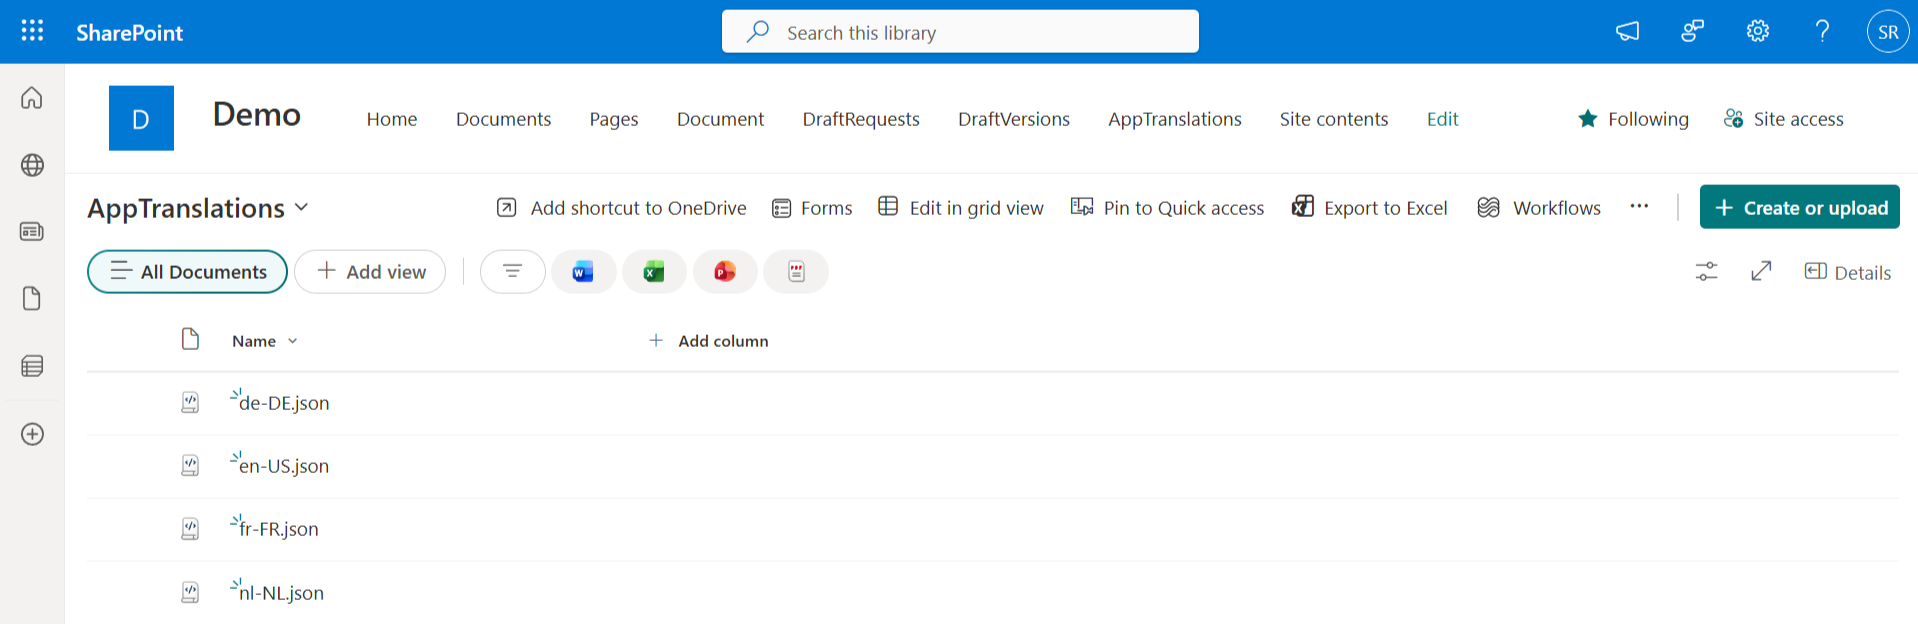
4. Confirm all four files appear: en-US.json, fr-FR.json, de-DE.json, nl-NL.json.
Once all files are uploaded, your SharePoint library is ready. This is the only place you or your localization team will ever need to go when a translation needs updating.
Step 2 - Create the Power Automate Flow
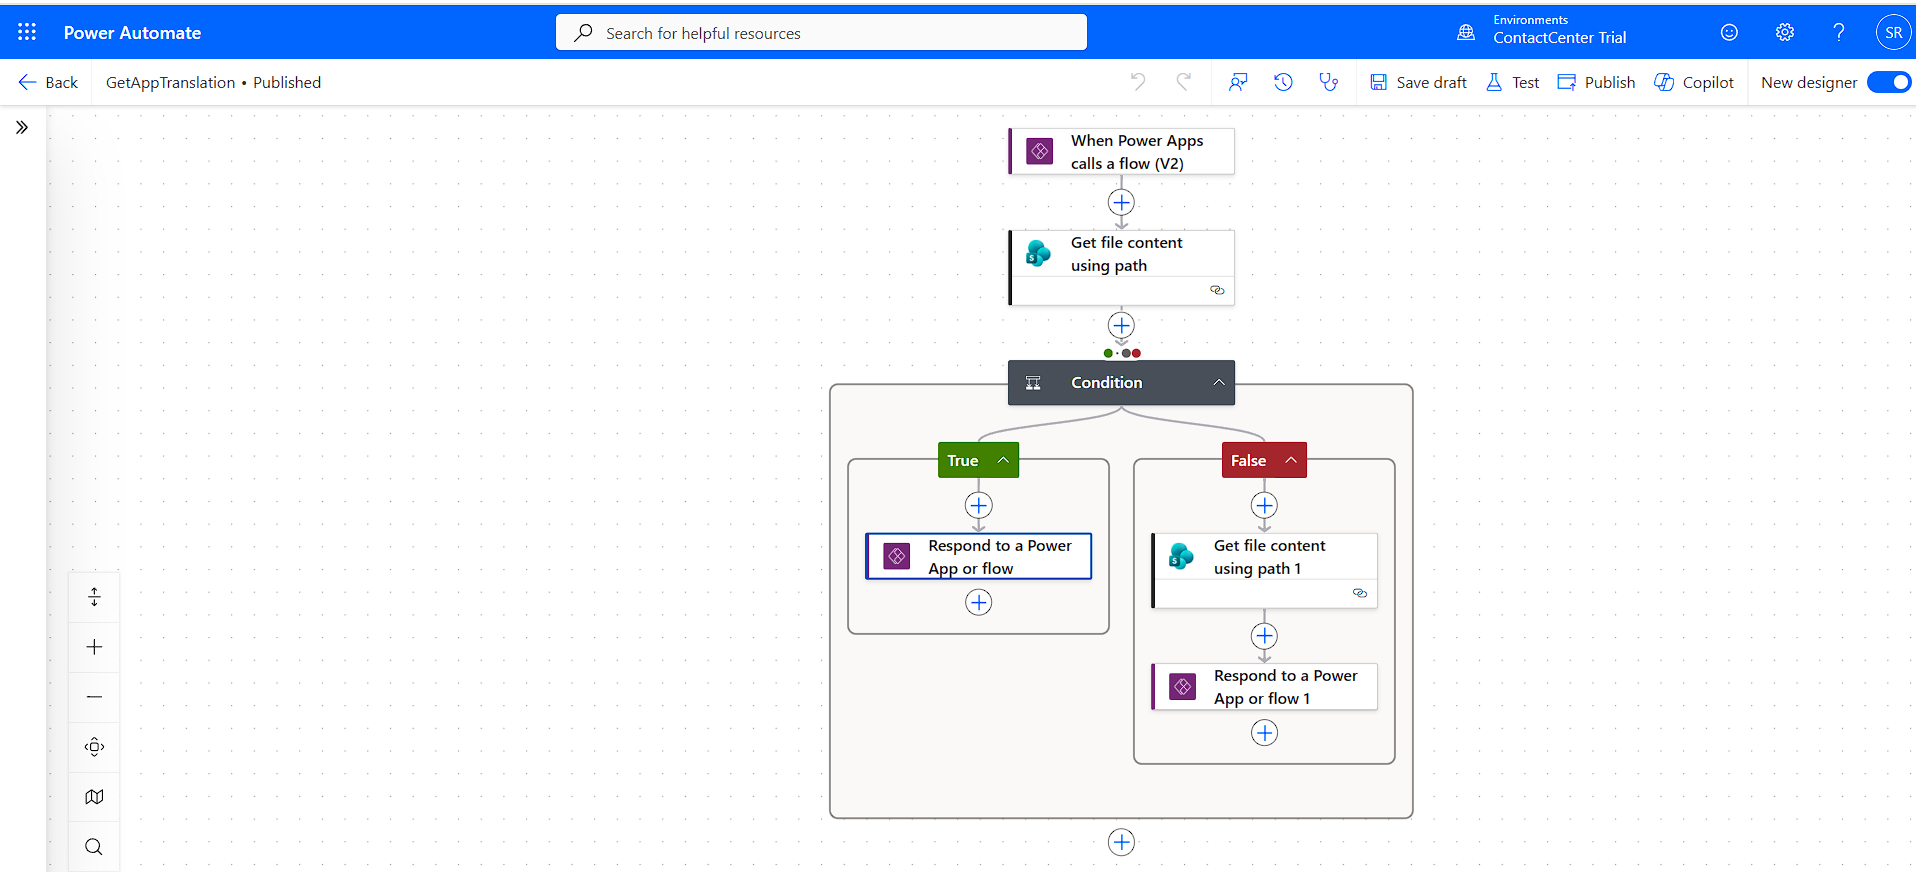
The Power Automate flow acts as the bridge between the Canvas App and SharePoint. When the app starts or the user switches language, it calls this flow with a locale code. The flow reads the matching JSON file and returns its content to the app.
2.1 - Create a New Instant Cloud Flow
1. Go to flow.microsoft.com and sign in.
2. Click + Create, then Instant cloud flow.
3. Name the flow GetAppTranslation.
4. Select PowerApps (V2) as the trigger.
5. Click Create.
2.2 - Configure the Trigger Input
1. In the trigger card, click + Add an input.
2. Select Text as the input type.
3. Name it locale.
This input will receive values like en-US, fr-FR, de-DE, or nl-NL from the Canvas App at runtime.
2.3 - Add the SharePoint Get File Content Action
1. Click + New step and search for SharePoint.
2. Select Get file content using path.
3. Site Address: Select your SharePoint site from the dropdown.
4. File Path: Type /AppTranslations/ then insert the locale dynamic value, then type .json after it.
5. Infer content type: Set to Yes.
The resulting file path will look like:
/AppTranslations/{locale}.json
2.4 - Configure Run After on the Condition Step
Add a Condition step after the SharePoint action. Click the three-dot menu on the Condition step and select Configure run after. Check both is successful and has failed, then click Done.
IMPORTANT: This is critical. SharePoint throws an error when a file is not found rather than returning null quietly. Without this setting, the flow will fail completely whenever a language file does not exist instead of gracefully falling back to English.
2.5 - Configure the Condition
Set the condition to check whether SharePoint actually returned file content:
Left Value: body('Get_file_content_using_path') Operator: is not equal to Right Value: null
2.6 - True Branch: Return the Translation JSON
1. Inside the True branch, add Respond to a PowerApp or flow.
2. Click + Add an output and select Text.
3. Name it translationJson.
4. Switch to the Expression tab and enter:
string(body('Get_file_content_using_path'))
NOTE: Why string() instead of base64ToString()? When Infer content type is Yes, SharePoint parses the JSON automatically into an object and the raw $content (base64) field becomes null. The string() function serializes that parsed object back into a JSON text string that Canvas App can consume.
2.7 - False Branch: Return the English Fallback
1. Inside the False branch, add another SharePoint Get file content using path action.
2. File Path: /AppTranslations/en-US.json (hardcoded English fallback).
3. Add Respond to a PowerApp or flow with a Text output named translationJson.
4. Value expression:
string(body('Get_file_content_using_path_1'))
2.8 - Save and Publish the Flow
1. Click Save in the top toolbar.
2. Click Publish to make the flow available to Canvas Apps.
Step 3 - Build the Canvas App
3.1 - Create a New Canvas App
1. Go to make.powerapps.com.
2. Click + Create, then Blank app, then Blank canvas app.
3. Open the app you want to perform this task in, or create a new blank Canvas App from make.powerapps.com and name it as per your requirement.
3.2 - Connect the Power Automate Flow
1. In the left panel, click the Power Automate icon.
2. Click Add flow and select GetAppTranslation.
The flow now appears under In your app and is ready to call from formulas.
IMPORTANT:The flow name used in your Canvas App formula must exactly match the name of the flow you created. If you named your flow GetAppTranslation, the formula must call GetAppTranslation.Run(). If the names do not match, the flow will not appear in the list and cannot be connected.
3.3 - App.OnStart Code
Select App from the Tree View, click the OnStart property, and paste the following code:
// 1. Detect user browser language
 Set(varLocale, Coalesce(Language(), "en-US"));

// 2. Call Power Automate to fetch the correct JSON
 Set(varRaw, GetAppTranslation.Run(varLocale));

// 3. Parse the JSON response into a global object
 Set(gblT, ParseJSON(varRaw.translationjson));

// 4. Flatten JSON into a searchable key-value collection
 ClearCollect(colT,
     {key: "common.save",       val: Text(gblT.common.save)},
     {key: "common.cancel",     val: Text(gblT.common.cancel)},
     {key: "common.delete",     val: Text(gblT.common.delete)},
     {key: "common.loading",    val: Text(gblT.common.loading)},
     {key: "common.noRecords",  val: Text(gblT.common.noRecords)},
     {key: "navigation.home",       val: Text(gblT.navigation.home)},
     {key: "navigation.dashboard",  val: Text(gblT.navigation.dashboard)},
     {key: "navigation.settings",   val: Text(gblT.navigation.settings)},
     {key: "dashboard.title",   val: Text(gblT.dashboard.title)},
     {key: "dashboard.welcome", val: Text(gblT.dashboard.welcome)}
 );

// 5. Set text direction and mark app as ready
 Set(gblDirection, Text(gblT.meta.direction));
 Set(varAppReady, true);
3.4 - Add Language Switcher Gallery
Insert a Horizontal Gallery (Insert > Gallery > Horizontal).
TIP:Similarly, you can apply this same LookUp() pattern to all other components you need in the app - dropdowns, error messages, column headers, form labels, notification banners, and any other text element. Every control that shows user-facing text should read from colT using its translation key.
TIP: Always wrap translation lookups with IfError() and provide a fallback string. This protects the app if a key is missing or if the collection has not loaded yet at design time.
Step 4 - Testing and Output
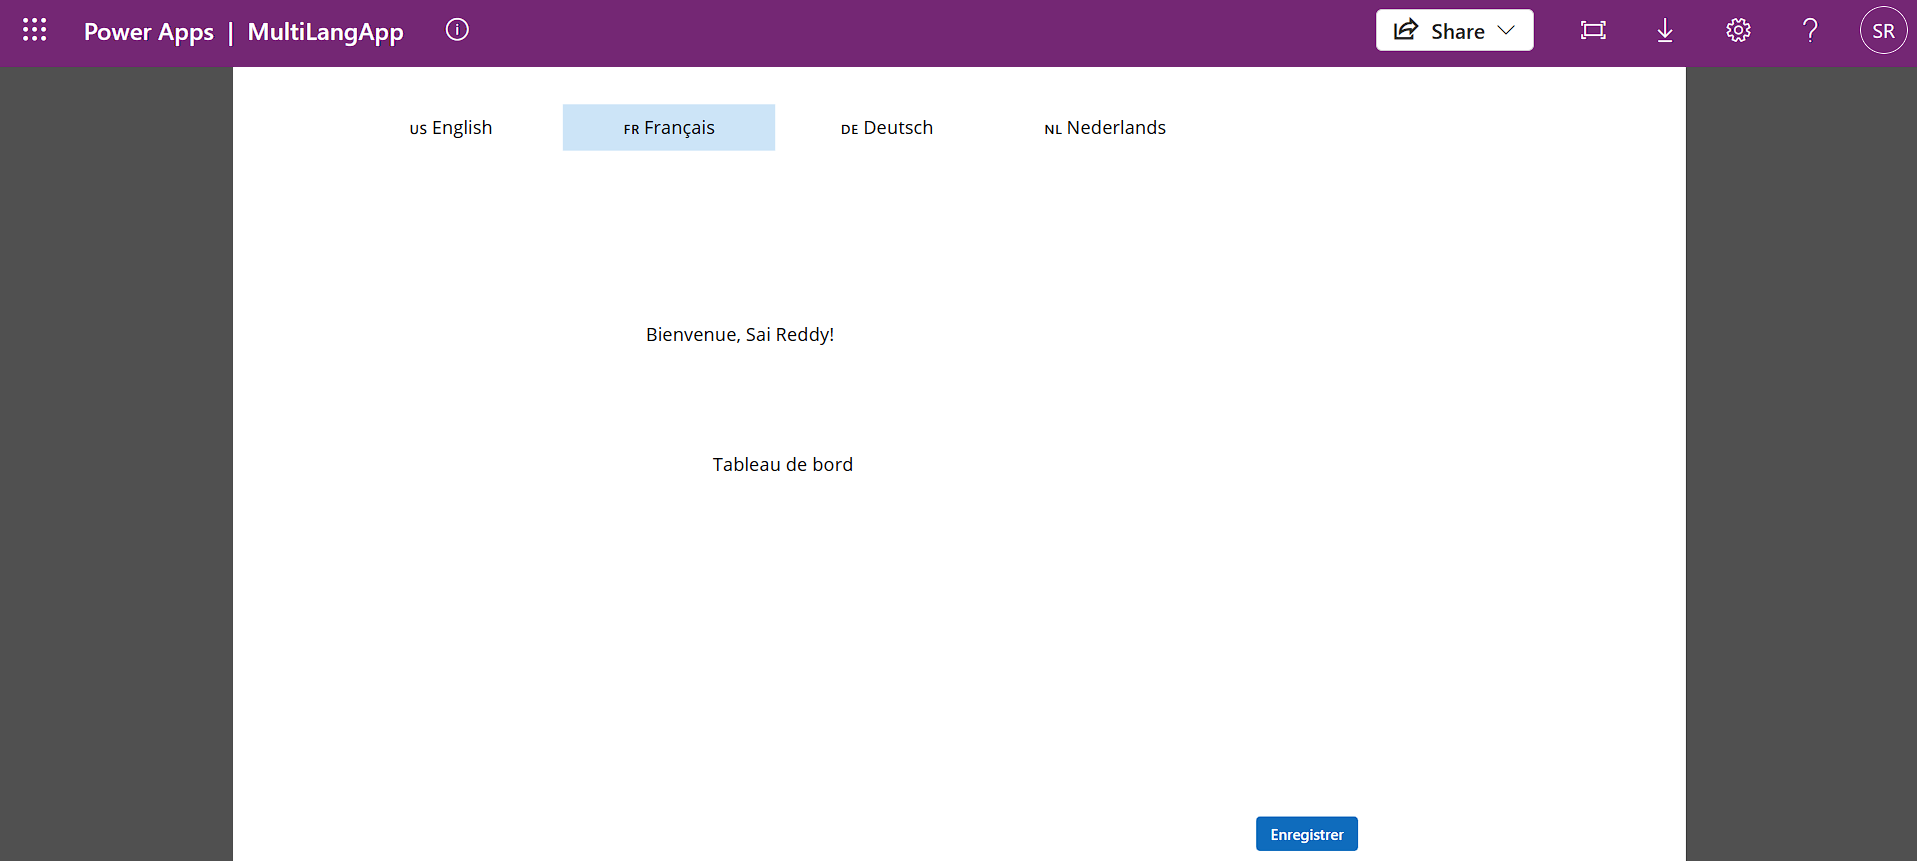
Press F5 in Power Apps Studio to preview the app. Click each language in the switcher gallery. All translated text refreshes within a second or two as the flow is called and the collection is rebuilt.
Language
Title
Welcome Message
Button
English
Dashboard
Welcome, [Name]!
Save
Francais
Tableau de bord
Bienvenue, [Name]!
Enregistrer
Deutsch
Dashboard
Willkommen, [Name]!
Speichern
Nederlands
Dashboard
Welkom, [Name]!
Opslaan
TIP: To add a new language later - simply upload a new JSON file (e.g., es-ES.json) to the SharePoint library and add one row to the gallery Items. No flow changes. No app republish needed.
Conclusion
Building multi-language support into a Canvas App does not have to mean duplicating your app or maintaining lengthy Switch() statements. By using JSON translation files stored in SharePoint, a Power Automate flow to retrieve the translations, and a simple LookUp() pattern within your controls, you can create a localization solution that is both scalable and easy to maintain for enterprise applications.
The key advantage of this approach is the clear separation of responsibilities. Developers focus on building and maintaining the application's functionality, while content or localization teams can update translations by modifying the JSON files without requiring changes to the app itself. This reduces maintenance effort and eliminates the need to republish the app for every translation update.
The examples in this guide demonstrate how to translate labels and other UI elements. Similarly, you can apply the same approach to all the components in your app, including buttons, tooltips, placeholders, validation messages, notifications, screen titles, menus, dialog boxes, and error messages, ensuring a consistent multilingual experience throughout the application.
Start with the languages your users need today, and expand as your application grows. For example, if you want to support Spanish in the future, simply add an es-ES.json translation file, update your language selection list, and the app will seamlessly support the new language without requiring significant changes to the existing implementation.
Frequently Asked Questions
1. Do I need to republish the app every time I update a translation?
No, and that is the biggest advantage of this approach. Translations are stored as JSON files in SharePoint, completely outside the app. When a translator updates a file, the change is live the next time a user opens the app or switches language. No developer involvement. No republish. No downtime.
2. What happens if a language file is missing or a translation key does not exist?
Two safety nets are in place. At the flow level, if the requested JSON file is not found in SharePoint, the flow falls back to en-US.json automatically. At the app level, every lookup is wrapped in IfError() with a hardcoded fallback string - so users always see something meaningful, never a blank label.
3. How do I add a new language like Spanish?
Create es-ES.json with Spanish translations following the same JSON structure, upload it to the AppTranslations SharePoint library, and add one new row to the gallery Items: {locale: "es-ES", label: "Espanol"}. The flow and app logic handle the rest automatically.
4. Can this handle right-to-left languages like Arabic?
Yes. Set the direction field in the JSON meta section to "rtl" for Arabic. The app stores this in gblDirection. Then set the LayoutDirection on any container to: If(gblDirection = "rtl", LayoutDirection.RightToLeft, LayoutDirection.LeftToRight). The entire container flips for RTL users automatically.
Q5. Is this approach suitable for large enterprise apps with hundreds of translation keys?
Absolutely. Organize keys into namespaces such as accounts.title or cases.validation.required, and build the colT collection in batches. You can also cache the collection using SaveData() and reload it with LoadData() on the next session to reduce Power Automate calls and improve startup performance significantly.