LogoLogo

Our Products

Metadata Browser

Edge Add-on

HTML To PDF Converter

Power Automate Connector

Data Mask for Dataverse

Dataverse App

Commission 365

Dynamics 365 App

AI Autocloser

Dataverse App

Flow Monitor

Power Automate App

ServicesAboutCareersBlogContact
Chat on Teams
Metadata BrowserHTML To PDF ConverterData Mask for DataverseCommission 365AI AutocloserFlow Monitor
ServicesAboutCareersBlogContactChat on Teams
HomeBlogCreate Apps from Images with Power Apps Express Design

Create Apps from Images with Power Apps Express Design

July 28, 2024
#Power Apps
Mahith Reddy
Create Apps from Images with Power Apps Express Design

Express Design in Power Apps is a new feature that allows you to quickly create Power Apps by transforming your visual designs or sketches into functional apps. Whether you have paper forms, whiteboard sketches, or Figma files, you can use Express Design to convert these design artifacts into working apps. 

 With the Image to App tool, upload an image of your wireframe or design, and follow the guided steps to tag components and connect your data.  

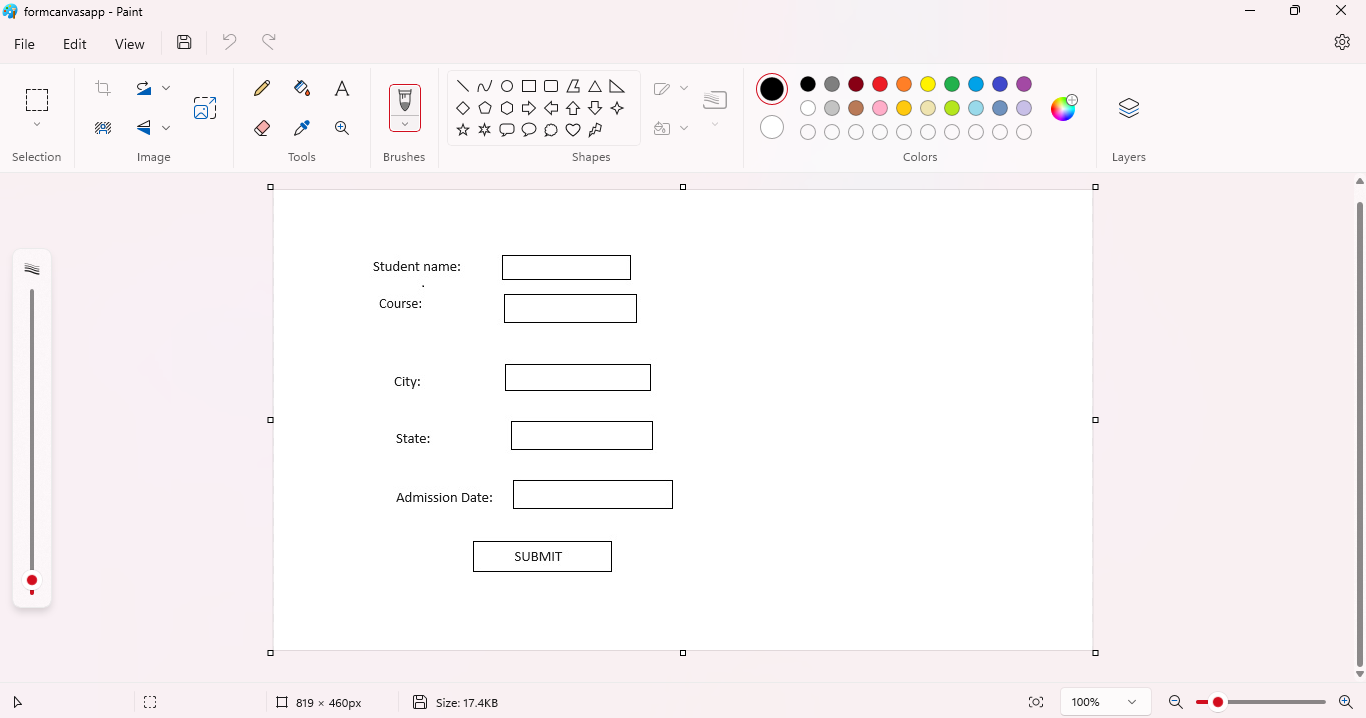
Firstly, create a sample sketch of a simple form using the Paint tool and save it. 

Introduction to Dynamics 01

Next, log in to Power Apps. 

Select Create from the Navigation menu and click on Image. 

Introduction to Dynamics 02

Go through the guidelines and click Next. 

Introduction to Dynamics 03

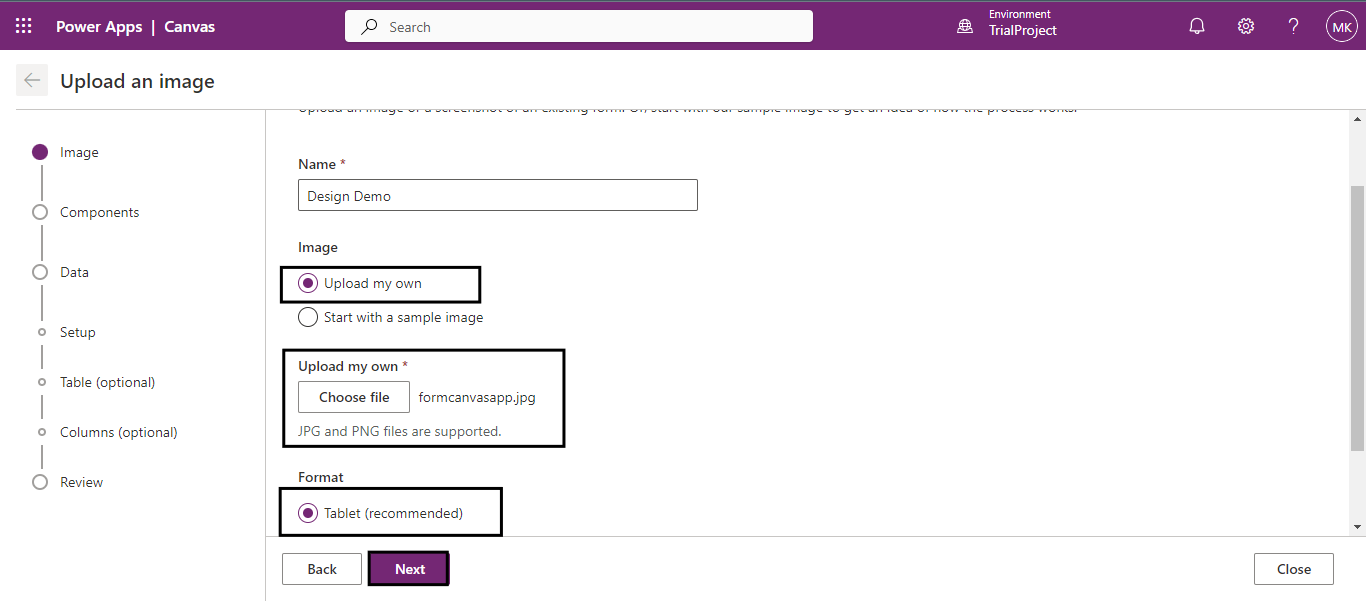
Under Image, select Upload my own option and upload the paint file that we just created. 

Select the format as Tablet and Click Next. 

Introduction to Dynamics 04

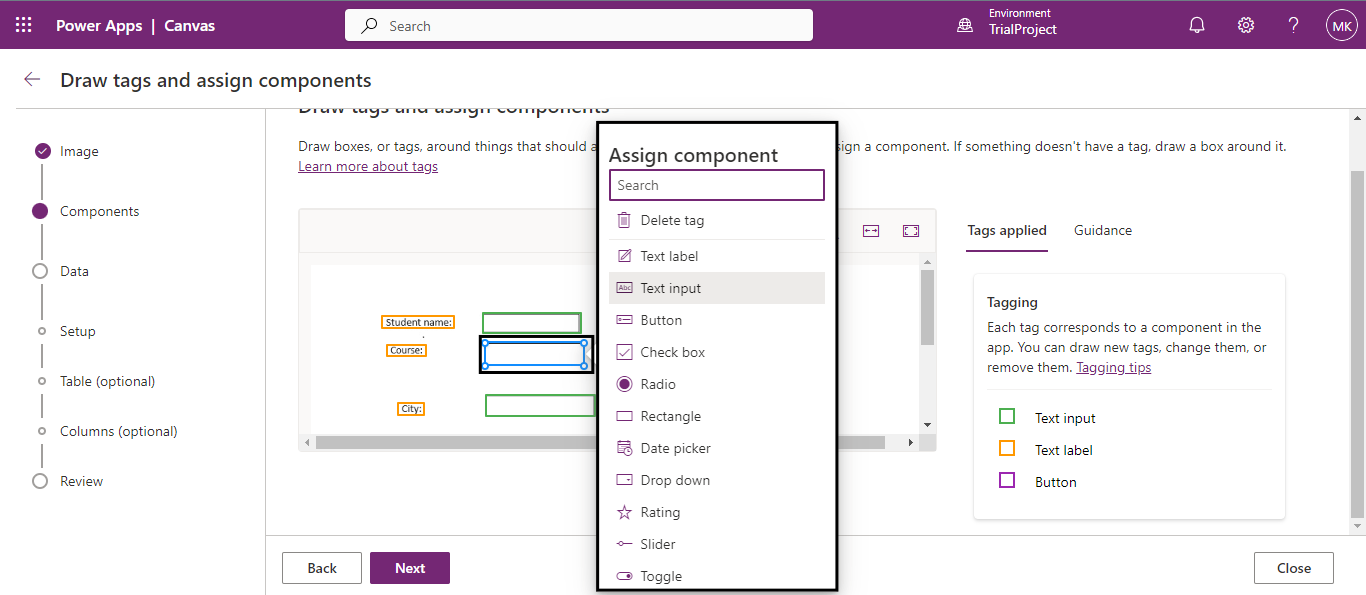
After uploading your design, you will find that all the objects in your image are already tagged or mapped by Power Apps. For example, in the image, "Student Name" is tagged as a text label in orange, and the green box corresponding to it is its text input. 

Introduction to Dynamics 05

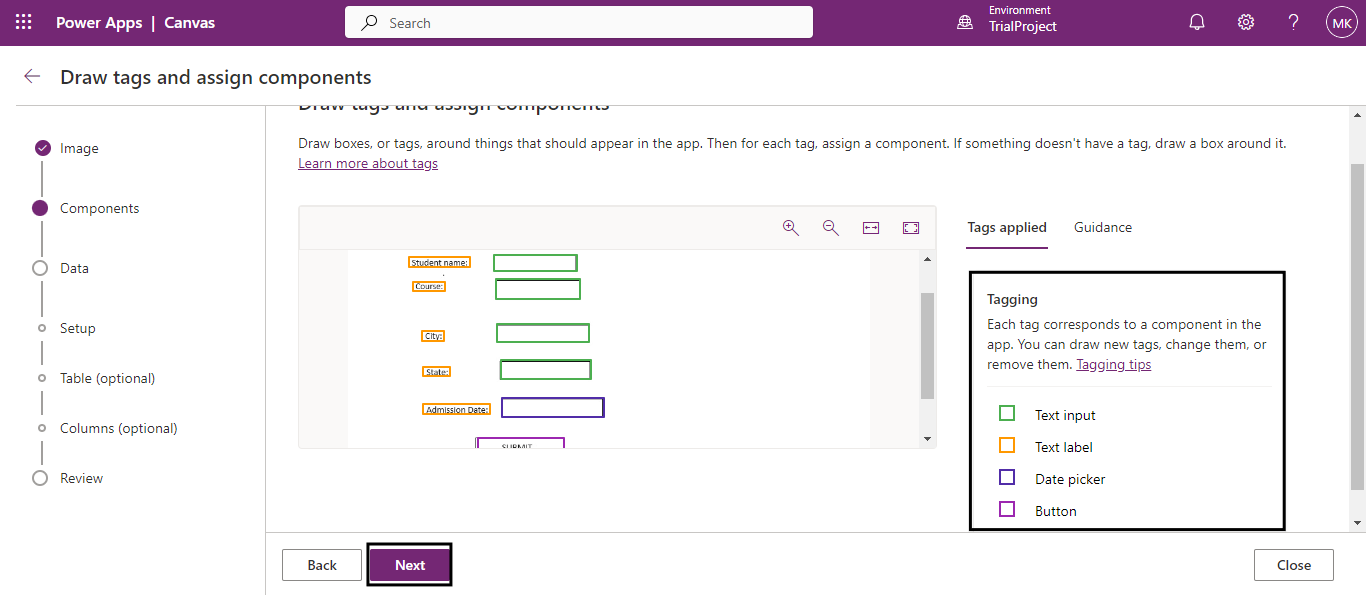
If you want to change a component’s tag, click on it and select the appropriate option from the list. 

Back to all articles

More from the blog

Creating and managing topics in Copilot Studio with Power Apps integration

Automate Image Data Extraction Using Power Apps and AI

Creating a Loading Animation in Power Apps

Creating Virtual Tables in Power Apps using Share Point Connector

Creating an App from Figma in Power Apps

How to Create Custom Connectors in Power Apps?

Implementing Catalog Manager: A Step-by-Step Guide in Power Apps

How to Install Catalog Manager in Power Apps?

Need help with your business solution?

Our team can help you implement the right solution for your organization.

Get in touch
LogoLogo

Ex-Microsoft experts helping businesses get more from their Dynamics 365 and Power Platform investments.

Products

Introduction to Dynamics 06

Once the correct mapping is done, click Next. 

The next step is to set up the data. Here, you can either connect the app to a data table or skip this step if you're unsure whether you need data. Select "Connect to a Dataverse Table" and click "Next." 

Introduction to Dynamics 07
Introduction to Dynamics 08

Here, you can connect the app to your data by creating a new table or selecting an existing table.  

Select the component in the app designer to change the datatype of the fields. For example, the "Admission Date" field can be set to either a text or date data type, so adjust it according to your requirements.

Introduction to Dynamics 09

The highlighted fields in blue indicate that users can tag fields in a form to match columns and data types. For example, the "Student Name" field is surrounded by a blue box, indicating that it is already tagged. 

On the right side, you can see the "Student name" and other columns listed with their display names and data types ("Text"). This means any data entered in the "Student name" field will be stored as text in the database. 

This tagging links the form fields to the correct columns in the database, ensuring that data is stored properly. If you need to change the tag, you can click on the "Student Name" field and select the appropriate option from the list. 

After the necessary tagging has been completed, click the "Next" button. 

Review the screen and components, and if everything seems good, click on Create. 

Introduction to Dynamics 10

The screen will be added to the app.  

Next, let’s set up the SUBMIT button. At the top of the screen, you'll see the OnSelect property. This controls what happens when you click the button. 

The formula set for OnSelect is SubmitForm(Form1); ResetForm(Form1), which means: 

  • SubmitForm(Form1): Submits the data filled in the form. 

  • ResetForm(Form1): Resets the form to its default state after submission. 

    Introduction to Dynamics 11

    Click on the play button to test the app. 

Introduction to Dynamics 12

  Insert some test data and click on the Submit button to submit the form.

Introduction to Dynamics 13

Go to Power apps, in the Tables look for the table we have created to save form data and open the table. 

Introduction to Dynamics 14

In the table, we can see the data is being saved. 

Introduction to Dynamics 15

Express Design in Power Apps simplifies app creation by converting your visual designs or sketches into functional applications. By following the above steps, using the Image to App tool, you can easily tag components, connect to data sources, and create apps quickly, even with minimal coding experience.

Frequently Asked Questions (FAQs):
1. What is Express Design in Power Apps? 

Express Design is a feature in Power Apps that converts visual designs, like sketches or Figma files, into functional apps. 

2. What formats are supported for the Image to App tool? 

You can upload images of your wireframes or designs in various formats such as sketches, paper forms, or digital design files. 

3. What does the tagging process involve? 

Tagging involves mapping components in your design to corresponding data fields, ensuring accurate data entry. 

4. Where can I see the submitted data? 

Go to Power Apps, search for the table you created, and open it to see the saved data entries. 

Metadata Browser
  • HTML To PDF Converter
  • Data Mask for Dataverse
  • Commission 365
  • AI Autocloser
  • Flow Monitor
  • Services

    • D365 Marketing
    • D365 Sales
    • D365 Customer Service
    • D365 Field Service

    Company

    • About Us
    • Blog
    • Contact
    • Careers

    Copyright ©2026 Pascalcase Software Private Limited. All rights reserved.

    Privacy PolicyTerms of Service