LogoLogo

Our Products

Metadata Browser

Edge Add-on

HTML To PDF Converter

Power Automate Connector

Data Mask for Dataverse

Dataverse App

Commission 365

Dynamics 365 App

AI Autocloser

Dataverse App

Flow Monitor

Power Automate App

ServicesAboutCareersBlogContact
Chat on Teams
Metadata BrowserHTML To PDF ConverterData Mask for DataverseCommission 365AI AutocloserFlow Monitor
ServicesAboutCareersBlogContactChat on Teams
HomeBlogCreating And Embedding a Copilot Bot in Dynamics 365

Creating And Embedding a Copilot Bot in Dynamics 365

March 26, 2025
#Copilot Studio#Dynamics 365
Charvi Chitturi
Creating And Embedding a Copilot Bot in Dynamics 365

Microsoft Copilot Studio enables organizations to build intelligent, secure, and context-aware bots that can be embedded directly into Dynamics 365. These bots can assist users by surfacing relevant data, automating responses, and improving case resolution efficiency without leaving the application.

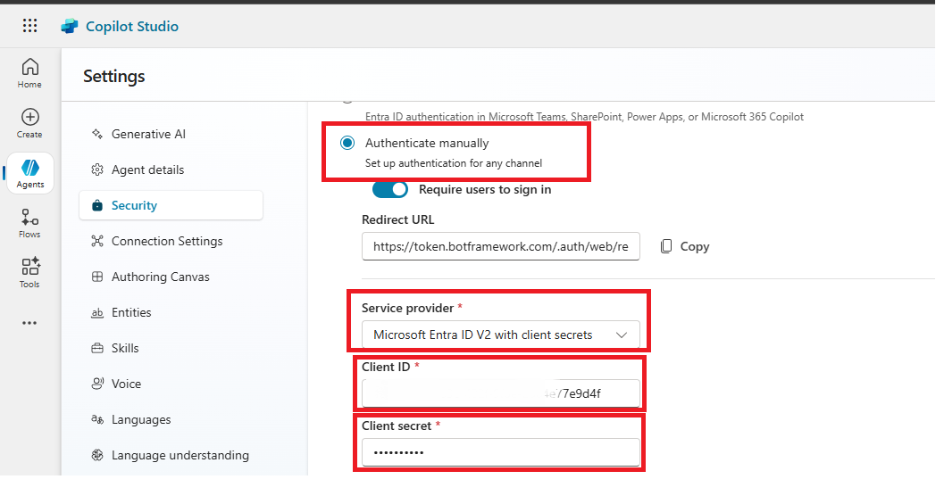
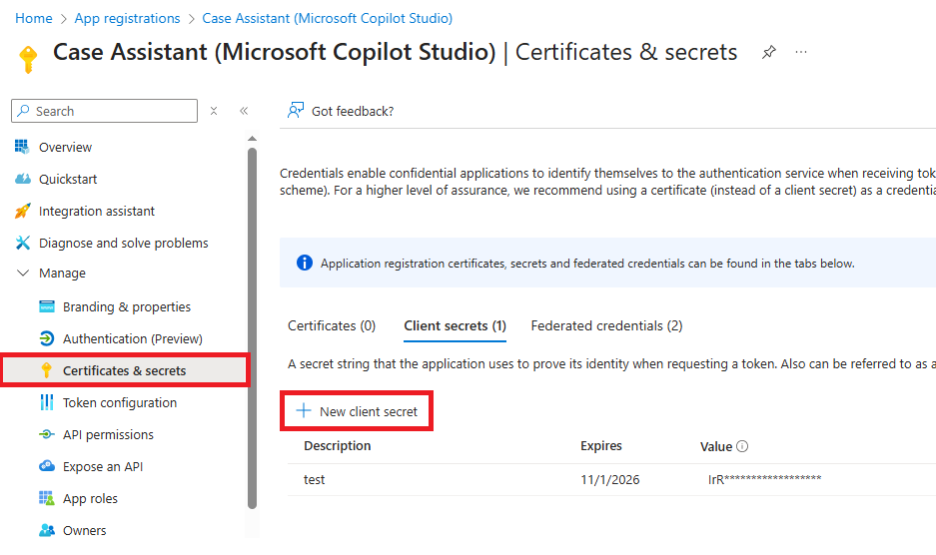
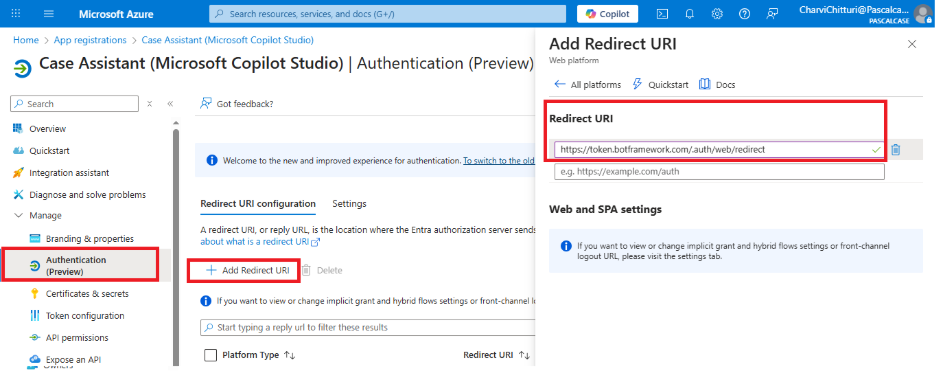
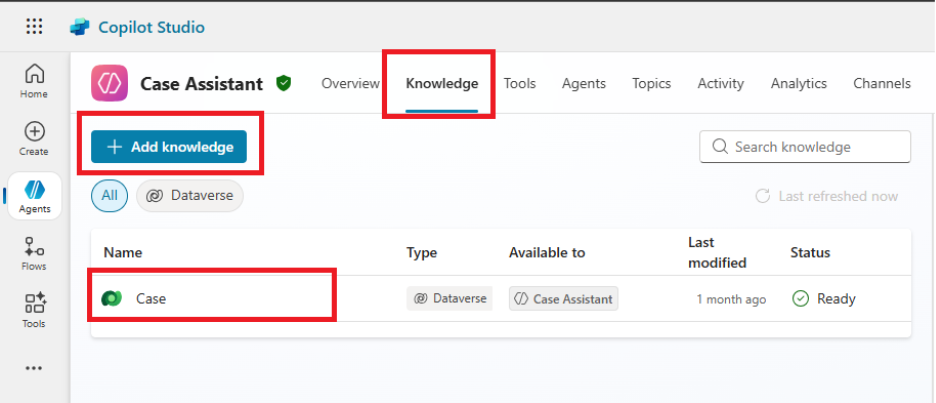
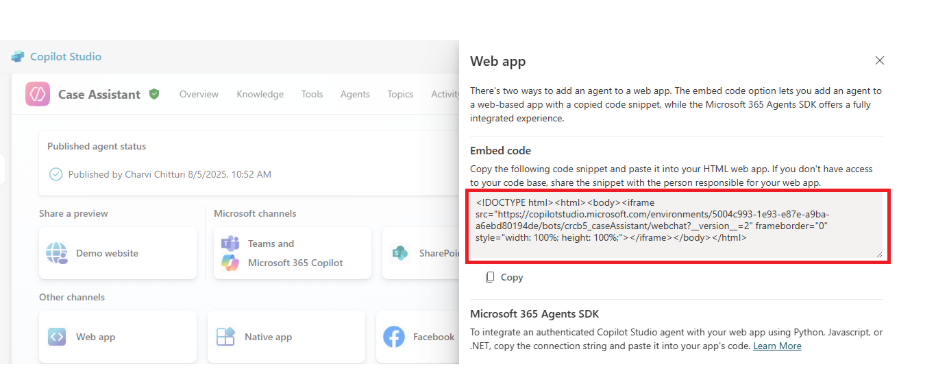
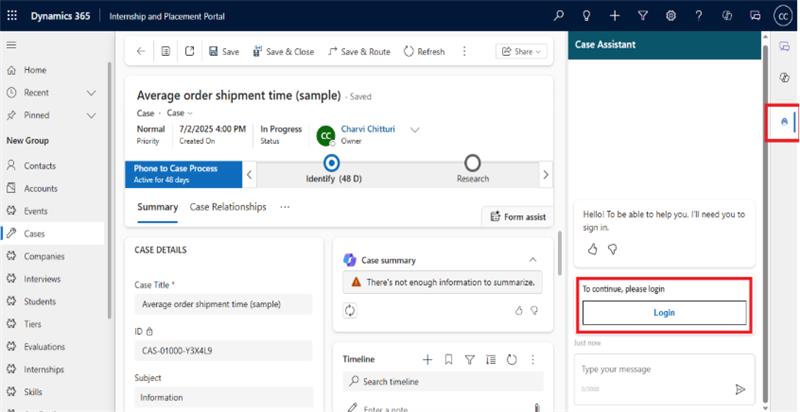
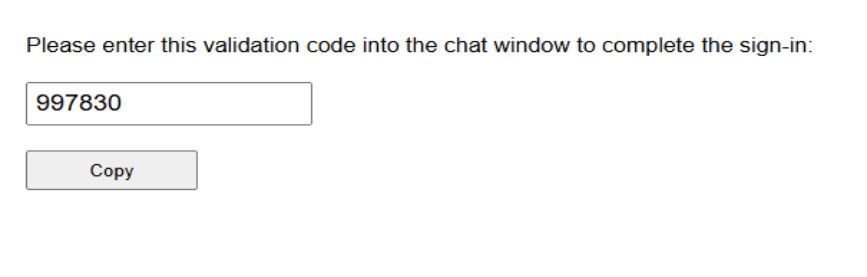
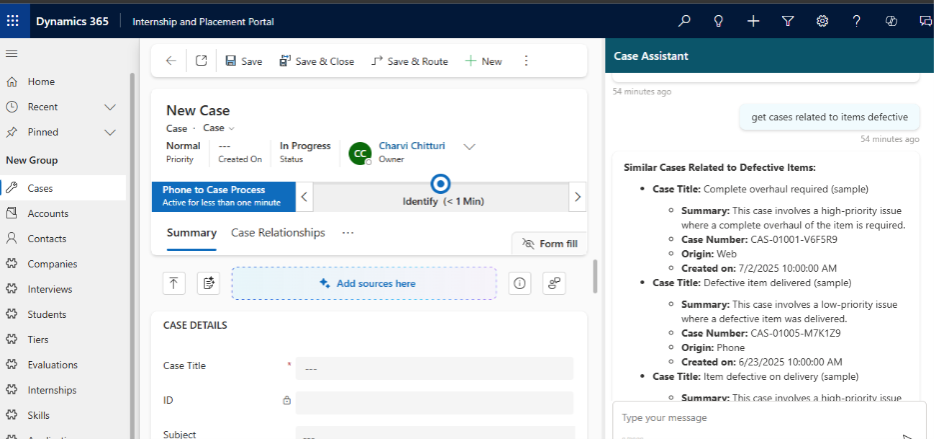
In this blog, we will walk through the end-to-end process of creating a Case Assistant bot using Copilot Studio and embedding it into a Dynamics 365 side pane. The bot will leverage Dataverse knowledge to suggest similar cases, authenticate securely using Microsoft Entra ID, and provide real-time assistance within the Case form.

  • Access Copilot Studio  Navigate to https://copilotstudio.microsoft.com

1
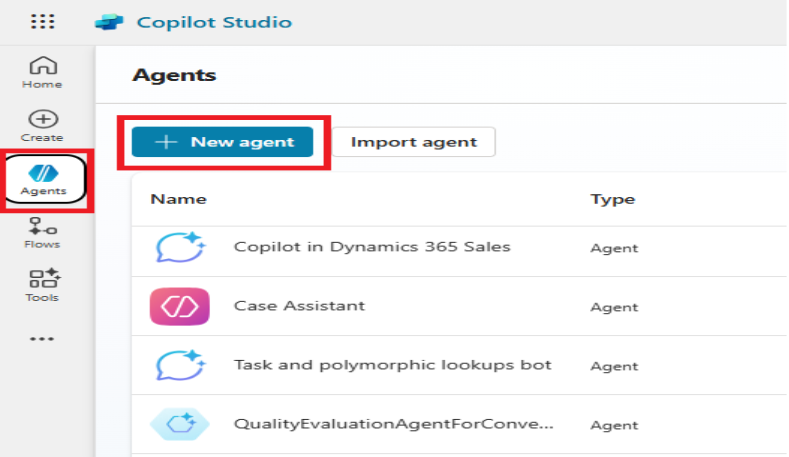
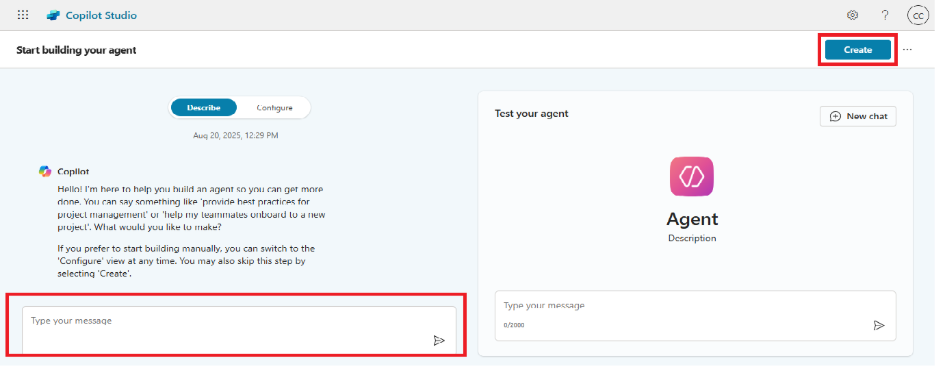
  • Click on the New Agent button.

  • Provide a suitable name for your bot.

  • Enter a prompt/description outlining the purpose and type of bot you wish to build.

  • If required, provide additional details or specifications to further tailor the bot to your business needs.

2
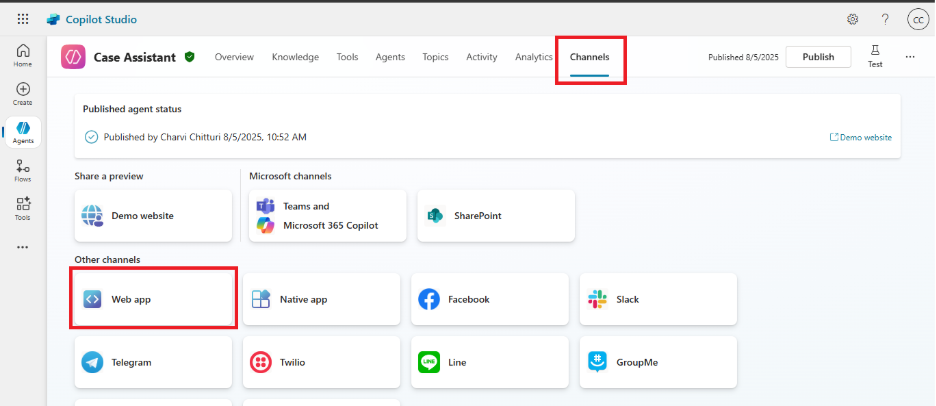
  • Once the configuration is complete, click Publish to make the bot available.
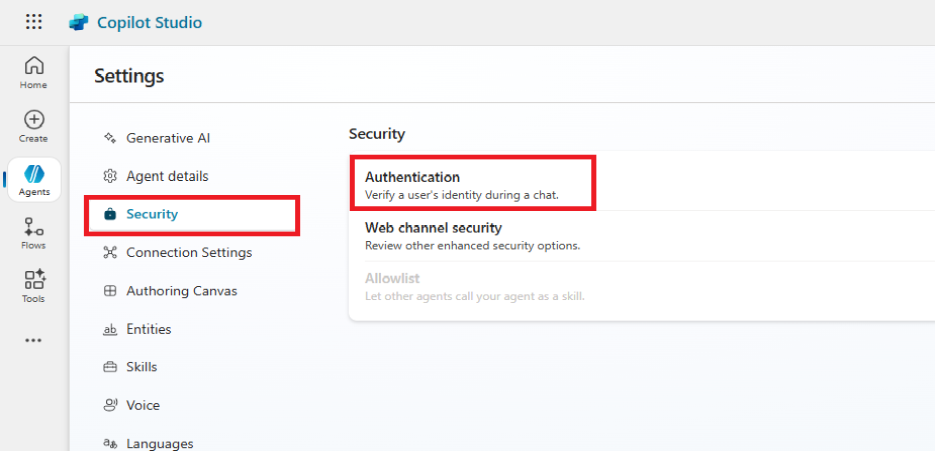
  • Then, navigate to .

Need help with your business solution?

Our team can help you implement the right solution for your organization.

Get in touch
LogoLogo

Ex-Microsoft experts helping businesses get more from their Dynamics 365 and Power Platform investments.

Products

Settings
  • Select Security to manage and configure access, permissions, and other security-related settings for your bot.

  • In Security and select Authentication.

  • 3
    • Choose Authenticate Manually, and under Service Provider, select Microsoft Entra ID V2 (Client Secret).

    • Use the Client ID and Client Secret from the Azure App Registration that is automatically created when the bot is provisioned.

    4
    • To generate a Client Secret, open the App Registration in the Azure Portal, navigate to Certificates & Secrets, create a new secret, and copy the generated value to use in Copilot Studio.

    5
    • Copy the Redirect URL provided in Copilot Studio Security and add it to the Redirect URI section of the App Registration in the Azure Portal under Authentication.

    6
    • After adding the redirect URL, save the authentication settings and publish the bot again to apply the changes.

    • In the Knowledge tab of your bot, add the entity you want to work on as a knowledge source. I am adding the Case entity as a knowledge source. Since I am creating a Case Assistant bot, this will allow the bot to retrieve and suggest similar cases that already exist in the system, helping users resolve issues more quickly.

    7
    • Navigate to the Channels tab in Copilot Studio, open your bot, and select the Web App.

    8
    • After selecting the Web App, the embed HTML code will be available for use. Copy this code and create a new HTML Web Resource within your solution in Power Apps. You can also apply customizations to adjust the size of the side pane in your app.

    9
    • Add a JavaScript web resource to open the bot in the side pane when the form loads. Additionally, upload an image web resource to represent the bot. In the JavaScript code, reference the HTML web resource created earlier and set the image source to the uploaded bot image.

    10

    //CaseAssistant.js

    const botPaneId = "caseBotPane";
     
    // Track if pane is already created
    var isPaneCreated = false;
     
    // Open CoPilot bot pane
    function showSidePane() {
        // Simple check to prevent duplicate creation
        if (isPaneCreated) {
            return;
        }
        
        try {
            Xrm.App.sidePanes.createPane({
                title: "Case Assistant",
                imageSrc: "WebResources/nw_bot",
                paneId: botPaneId,
                hideHeader: true,
                canClose: true,
                width: 350
            }).then(function (pane) {
                isPaneCreated = true;
                
                pane.navigate({
                    pageType: "webresource",
                    webresourceName: "nw_CaseAssistantHtml" // Use your actual name here
                });
                
                pane.onClosed(function () {
                    console.log("Bot closed manually.");
                    isPaneCreated = false; // Reset flag when pane is closed
                });
            }).catch(function(error) {
                console.log("Pane creation error:", error);
                isPaneCreated = false; // Reset flag on error
            });
        } catch (error) {
            console.log("Error in showSidePane:", error);
            isPaneCreated = false;
        }
    }
     
    // Closes the bot pane if it's open
    function closeBotSidePane() {
        if (!isPaneCreated) {
            return;
        }
        
        try {
            // Reset the flag
            isPaneCreated = false;
            
            // The pane will be closed automatically when the form/page unloads
            // If you need to close it programmatically, you would need to store the pane reference
            console.log("Closing bot pane...");
        } catch (error) {
            console.log("Error closing pane:", error);
        }
    }
     
    function registerUnloadHandler() {
        if (!window._botPaneUnloadHooked) {
            window.addEventListener("beforeunload", closeBotSidePane);
            window._botPaneUnloadHooked = true;
        }
    }
    // OnLoad function — register handlers & show bot
    function onFormLoad(executionContext) {
        showSidePane();
        registerUnloadHandler(); 
    }
    
    • Now, navigate to your app, open any Case record, and click on the bot in the side pane

    11
    • When you click Login, a code will be generated in a separate tab. Enter this code as the input, and once authenticated, you will be logged in and can start asking for similar cases.

    12

    Now, you can see the bot actively responding and providing relevant answers within the side pane.

    13

    Frequently Asked Questions (FAQ’s):

    1. Can I use the bot in entities other than Case?

    Yes. You can add any Dataverse entity as a knowledge source based on your business requirements, such as Leads, Opportunities, or Bookings.

    2. Where does the bot appear inside Dynamics 365?

    The bot appears in a side pane within the form, allowing users to interact with it without navigating away from the record.

    3. Can the bot suggest similar records automatically?

    Yes. When configured with a knowledge source, the bot can analyze input and suggest similar existing records to help users resolve queries faster.

    4. Is it possible to control when the bot opens?

    Yes. Using JavaScript, you can configure the bot to open on form load, button click, or any custom event.

    5. What happens if I update the bot content later?

    You need to publish the bot again in Copilot Studio for the updates to reflect in Dynamics 365.

    6. Can the bot be closed by users?

    Yes. The side pane can be configured to allow users to close or reopen the bot as needed.

    7. Is it possible to change the bot name and branding later?

    Yes. You can update the bot name, icon, and description anytime in Copilot Studio and reflect those changes in your app.

    Back to all articles

    More from the blog

    Generate Temporary Download URLs in Dynamics 365 Using GetFileSasUrl

    Enable Audio Playback in Dynamics 365 Contact Forms Using JavaScript

    Integrating Your Copilot Agent with Teams

    Email Smarter in Outlook with Sales Copilot and Power Apps Integration

    Setting Up Event Triggers in Copilot Studio

    Close Case on condition using Power Automate

    Understanding and Using Polymorphic Lookups in Dynamics 365 with XrmToolBox

    Connect Dynamics 365 to Console App Using Application Registration

    Metadata Browser
  • HTML To PDF Converter
  • Data Mask for Dataverse
  • Commission 365
  • AI Autocloser
  • Flow Monitor
  • Services

    • D365 Marketing
    • D365 Sales
    • D365 Customer Service
    • D365 Field Service

    Company

    • About Us
    • Blog
    • Contact
    • Careers

    Copyright ©2026 Pascalcase Software Private Limited. All rights reserved.

    Privacy PolicyTerms of Service